MinIO is a practical way to run an S3-compatible object store on your own infrastructure. For this deployment, I wanted two clean public interfaces:
https://s3.storage.example.comfor the S3 APIhttps://storage.example.comfor the administrative console
The S3 endpoint needed to be publicly reachable but protected by S3 authentication. The console needed an additional IP allowlist. MinIO's internal ports could not be exposed directly.
There was one important complication: MinIO Community Edition is now source-only, and its upstream repository was archived in April 2026. That means this setup carries a real maintenance risk. It is suitable only when you understand that there will be no future community security updates from the archived project.
This article deliberately uses placeholders such asYOUR_SERVER_IP,YOUR_ADMIN_IP, andexample.com. Never publish production access keys, secret keys, environment files, or password-manager screenshots.
Architecture
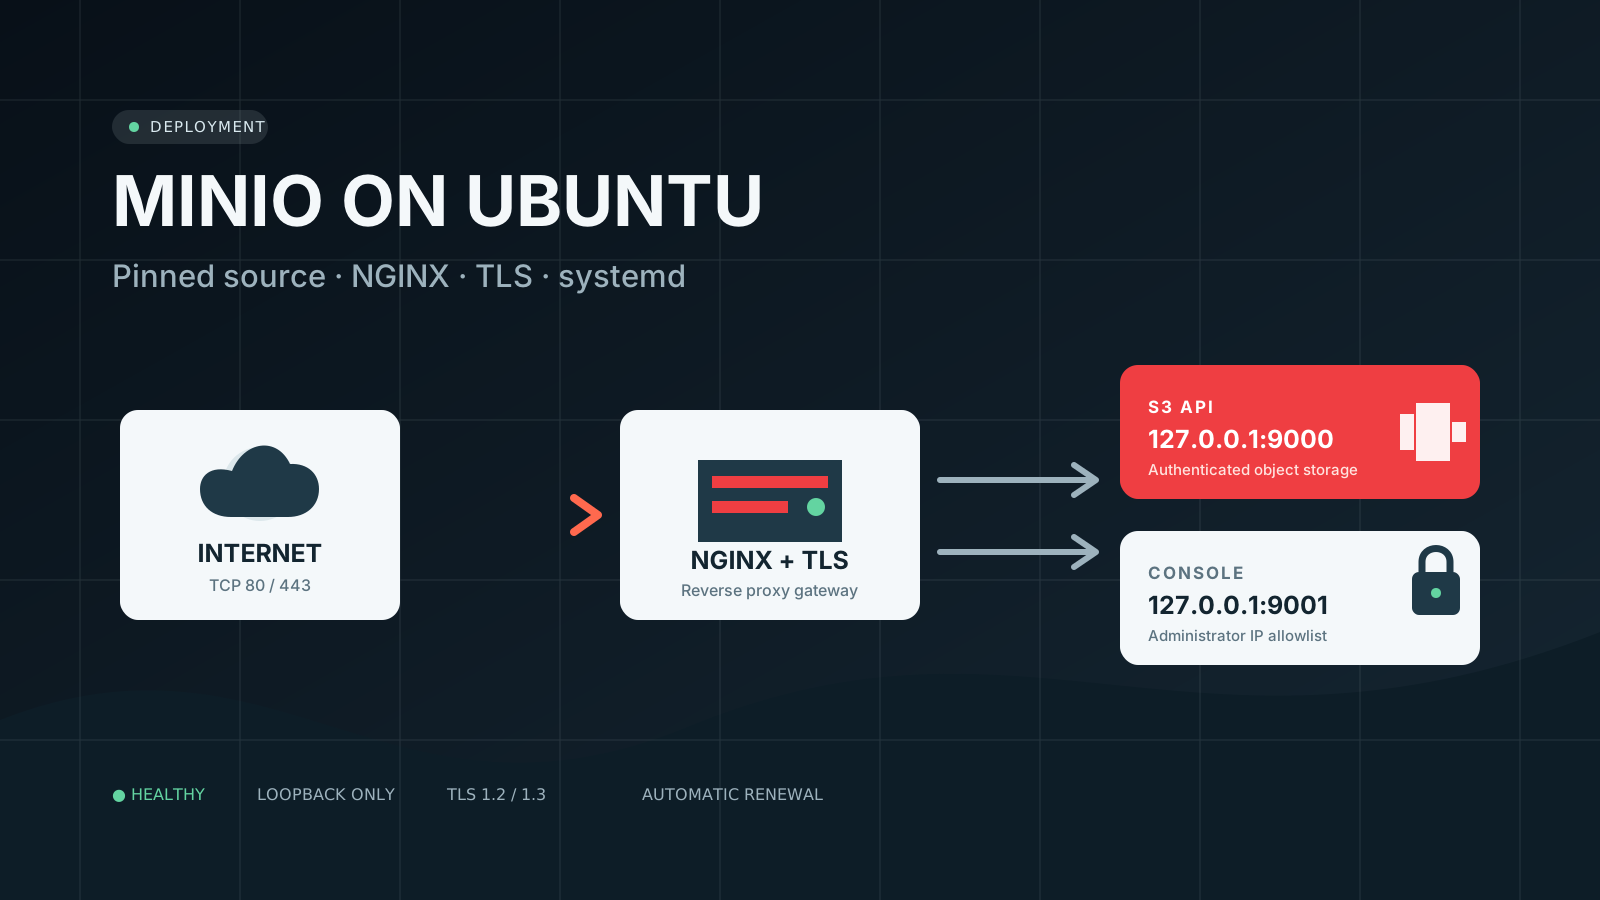
The final request flow is deliberately simple:
Internet
   |
   |  TCP 80/443
   v
NGINX + Let's Encrypt
   |-- s3.storage.example.com ------> 127.0.0.1:9000
   |                                  MinIO S3 API
   |
   `-- storage.example.com ---------> 127.0.0.1:9001
                                      MinIO Console
                                      IP restricted
MinIO stores its data on /var/lib/minio. This example is a single-node, single-disk deployment, so it has no storage redundancy. Use replication or an off-host backup for data you cannot afford to lose.
1. Check the server before changing it
Start by confirming the operating system, free disk space, memory, active listeners, and existing firewall state:
cat /etc/os-release
df -h /
free -h
ss -lntup
sudo ufw status verbose
Make sure ports 9000 and 9001 are unused. Also confirm that you have a working SSH session before enabling or modifying a firewall.
For this deployment I used Ubuntu 24.04 with a 40 GB system disk. The same disk stores both the operating system and MinIO data, which is acceptable for a small installation but not resilient against disk failure.
2. Install build and runtime dependencies
Install Git, NGINX, Certbot, UFW, and the basic download and certificate tools:
sudo apt-get update
sudo apt-get install -y \
  git \
  curl \
  ca-certificates \
  nginx \
  certbot \
  python3-certbot-nginx \
  ufw \
  openssl
Do not enable UFW until the SSH, HTTP, and HTTPS allow rules are ready.
3. Install the required Go toolchain
The final archived MinIO source declares Go 1.24.8 as its toolchain. Download the official archive and verify it before extracting anything as root:
curl -fL \
  -o /tmp/go1.24.8.linux-amd64.tar.gz \
  https://go.dev/dl/go1.24.8.linux-amd64.tar.gz
Verify the official SHA-256 checksum:
echo '6842c516ca66c89d648a7f1dbe28e28c47b61b59f8f06633eb2ceb1188e9251d  /tmp/go1.24.8.linux-amd64.tar.gz' \
  | sha256sum -c -
The expected result is:
/tmp/go1.24.8.linux-amd64.tar.gz: OKInstall Go and verify the runtime:
sudo tar -C /usr/local -xzf /tmp/go1.24.8.linux-amd64.tar.gz
/usr/local/go/bin/go version
4. Clone and pin the archived MinIO source
Never build an unpinned latest version for a production deployment. Clone the repository, check the commit, and build the exact source you reviewed:
git clone --filter=blob:none \
  https://github.com/minio/minio.git \
  /tmp/minio-src

cd /tmp/minio-src
git checkout 7aac2a2c5b7c882e68c1ce017d8256be2feea27f
git rev-parse HEAD
At the time of this deployment, 7aac2a2c5b7c882e68c1ce017d8256be2feea27f was the immutable archived repository HEAD.
Build using the repository's own build target:
export PATH=/usr/local/go/bin:$PATH
export GOMAXPROCS=2
make build
On a small VM this can take several minutes and use swap while compiling.
Record the result before installation:
./minio --version
sha256sum ./minio
Then install it:
sudo install -o root -g root -m 0755 ./minio /usr/local/bin/minioKeep the source commit, Go version, archive checksum, MinIO version, and binary checksum in an operations record. Those details are essential when a future replacement or rebuild is required.
5. Create a locked service account and data directory
Run MinIO as its own non-login system user:
sudo useradd \
  --system \
  --user-group \
  --home-dir /var/lib/minio \
  --shell /usr/sbin/nologin \
  minio

sudo passwd --lock minio
sudo install -d -o minio -g minio -m 0750 /var/lib/minio
sudo install -d -o root -g minio -m 0750 /etc/minio
The service user should own the data directory, but it should not own the binary, systemd unit, or credential file.
6. Generate credentials without leaking them
Generate a strong root access key and secret key locally on the server. Do not add their values to your shell history or systemd command line.
One safe pattern is to create /etc/minio/minio.env with a root-only script that writes random values directly to the file. The finished file should conceptually contain:
MINIO_ROOT_USER=<random-access-key>
MINIO_ROOT_PASSWORD=<random-secret-key>
MINIO_BROWSER_REDIRECT_URL=https://storage.example.com
Set restrictive ownership and permissions:
sudo chown root:minio /etc/minio/minio.env
sudo chmod 0640 /etc/minio/minio.env
Do not publish the contents of this file. Store the generated credentials in a password manager and display them only to the intended administrator.
You may see older guides setting MINIO_SERVER_URL to the public S3 hostname. In this archived build, that caused the embedded console's STS login request to fail when it looped back through the public TLS proxy. I intentionally omitted it so the console authenticates against MinIO over loopback. Public applications still use the external S3 hostname normally.
7. Create a hardened systemd service
Create /etc/systemd/system/minio.service:
[Unit]
Description=MinIO Object Storage
Documentation=https://github.com/minio/minio
Wants=network-online.target
After=network-online.target
AssertFileIsExecutable=/usr/local/bin/minio

[Service]
Type=notify
User=minio
Group=minio
EnvironmentFile=/etc/minio/minio.env
ExecStart=/usr/local/bin/minio server --address 127.0.0.1:9000 --console-address 127.0.0.1:9001 /var/lib/minio
Restart=always
RestartSec=5s
TimeoutStopSec=infinity
LimitNOFILE=65536
TasksMax=infinity

NoNewPrivileges=true
PrivateTmp=true
PrivateDevices=true
ProtectSystem=strict
ProtectHome=true
ProtectKernelTunables=true
ProtectKernelModules=true
ProtectKernelLogs=true
ProtectControlGroups=true
ProtectClock=true
ProtectHostname=true
ProtectProc=invisible
RestrictSUIDSGID=true
RestrictRealtime=true
RestrictNamespaces=true
LockPersonality=true
MemoryDenyWriteExecute=true
CapabilityBoundingSet=
AmbientCapabilities=
SystemCallArchitectures=native
RestrictAddressFamilies=AF_UNIX AF_INET AF_INET6 AF_NETLINK
ReadWritePaths=/var/lib/minio
UMask=0027
RemoveIPC=true

[Install]
WantedBy=multi-user.target
Two details matter in this hardening profile:
- MinIO needs
AF_NETLINKfor local interface discovery. - Do not use
ProcSubset=pid; MinIO needs read-only access to/proc/mountsto validate its storage path.
Enable and start the service:
sudo systemctl daemon-reload
sudo systemctl enable --now minio
sudo systemctl status minio --no-pager
8. Verify MinIO before adding the proxy
Check both health endpoints locally:
curl -I http://127.0.0.1:9000/minio/health/live
curl -I http://127.0.0.1:9000/minio/health/ready
Both should return HTTP 200.
Confirm that MinIO is not listening on a public interface:
ss -lntp | grep -E ':9000|:9001'The addresses should be loopback addresses such as 127.0.0.1, not 0.0.0.0.
Before continuing, use an S3 client to perform an authenticated test: create a temporary bucket, upload an object, list it, download and compare it, then delete the object and bucket.
9. Configure NGINX for HTTP and ACME challenges
Start with an HTTP-only server so Let's Encrypt can validate both DNS names:
server {
    listen 80;
    listen [::]:80;
    server_name storage.example.com s3.storage.example.com;

    location ^~ /.well-known/acme-challenge/ {
        root /var/www/letsencrypt;
        default_type text/plain;
    }

    location / {
        return 308 https://$host$request_uri;
    }
}
Create the challenge directory, enable the site, and validate NGINX:
sudo install -d -o www-data -g www-data -m 0755 \
  /var/www/letsencrypt/.well-known/acme-challenge

sudo ln -s /etc/nginx/sites-available/minio /etc/nginx/sites-enabled/minio
sudo nginx -t
sudo systemctl reload nginx
10. Add the DNS records
Create exact A records at your DNS provider:
storage.example.com     A     YOUR_SERVER_IP
s3.storage.example.com  A     YOUR_SERVER_IP
A 300-second TTL is convenient during setup. Remove conflicting exact records. If the domain has a wildcard record, exact A records will take precedence.
Verify through more than one public resolver:
dig +short A storage.example.com @1.1.1.1
dig +short A s3.storage.example.com @1.1.1.1
dig +short A storage.example.com @8.8.8.8
dig +short A s3.storage.example.com @8.8.8.8
Do not request the certificate until every answer points to the correct server.
11. Configure the cloud firewall and UFW
At the cloud-provider security group, allow only:
- TCP 22 from a trusted administrative source
- TCP 80 from
0.0.0.0/0 - TCP 443 from
0.0.0.0/0
Do not use an allow-all rule, and do not expose ports 9000 or 9001.
Configure UFW before enabling it:
sudo ufw allow OpenSSH
sudo ufw allow 80/tcp
sudo ufw allow 443/tcp
sudo ufw --force enable
sudo ufw status verbose
Using both a cloud security group and UFW provides defense in depth.
12. Obtain one certificate for both hostnames
Request a single certificate with the webroot challenge:
sudo certbot certonly \
  --webroot \
  --webroot-path /var/www/letsencrypt \
  --cert-name storage.example.com \
  -d storage.example.com \
  -d s3.storage.example.com
The certificate will be stored below:
/etc/letsencrypt/live/storage.example.com/13. Configure the final HTTPS reverse proxy
The S3 virtual host proxies to port 9000 and disables buffering for streaming uploads:
map $http_upgrade $connection_upgrade {
    default upgrade;
    ''      close;
}

server {
    listen 443 ssl http2;
    listen [::]:443 ssl http2;
    server_name s3.storage.example.com;

    ssl_certificate /etc/letsencrypt/live/storage.example.com/fullchain.pem;
    ssl_certificate_key /etc/letsencrypt/live/storage.example.com/privkey.pem;
    ssl_protocols TLSv1.2 TLSv1.3;

    client_max_body_size 0;
    proxy_buffering off;
    proxy_request_buffering off;
    proxy_http_version 1.1;
    proxy_connect_timeout 300;
    proxy_send_timeout 300;
    proxy_read_timeout 300;
    send_timeout 300;

    location / {
        proxy_set_header Host $http_host;
        proxy_set_header X-Real-IP $remote_addr;
        proxy_set_header X-Forwarded-For $proxy_add_x_forwarded_for;
        proxy_set_header X-Forwarded-Proto https;
        proxy_set_header Connection "";
        proxy_pass http://127.0.0.1:9000;
    }
}
The console virtual host proxies to port 9001 and permits only the administrator's public IP:
server {
    listen 443 ssl http2;
    listen [::]:443 ssl http2;
    server_name storage.example.com;

    ssl_certificate /etc/letsencrypt/live/storage.example.com/fullchain.pem;
    ssl_certificate_key /etc/letsencrypt/live/storage.example.com/privkey.pem;
    ssl_protocols TLSv1.2 TLSv1.3;

    location / {
        allow YOUR_ADMIN_IP/32;
        deny all;

        proxy_http_version 1.1;
        proxy_set_header Host $http_host;
        proxy_set_header X-Real-IP $remote_addr;
        proxy_set_header X-Forwarded-For $proxy_add_x_forwarded_for;
        proxy_set_header X-Forwarded-Proto https;
        proxy_set_header Upgrade $http_upgrade;
        proxy_set_header Connection $connection_upgrade;
        proxy_buffering off;
        proxy_read_timeout 300;
        proxy_pass http://127.0.0.1:9001;
    }
}
Ubuntu's NGINX 1.24 expects HTTP/2 in the listen directive. The newer http2 on; syntax is not accepted by that build.
Validate before reloading:
sudo nginx -t
sudo systemctl reload nginx
14. Test certificate renewal
Certbot installs a systemd timer, but NGINX must reload after a renewed certificate is written. Add a deployment hook that runs:
nginx -t
systemctl reload nginx
Then test the renewal workflow without waiting for expiration:
sudo certbot renew --dry-run --no-random-sleep-on-renew
systemctl status certbot.timer --no-pager
15. Perform the final checks
Verify HTTP redirection:
curl -I http://s3.storage.example.com/minio/health/liveVerify the public HTTPS health endpoints:
curl -I https://s3.storage.example.com/minio/health/live
curl -I https://s3.storage.example.com/minio/health/ready
Test the certificate names and validity:
openssl s_client \
  -connect s3.storage.example.com:443 \
  -servername s3.storage.example.com \
  </dev/null 2>/dev/null \
  | openssl x509 -noout -subject -issuer -dates -ext subjectAltName
From the approved administrative IP, open:
https://storage.example.comFrom another source IP, the same address should return HTTP 403.
Finally, repeat the authenticated S3 create, upload, list, download, and delete test through the public HTTPS endpoint. Confirm that public connection attempts to ports 9000 and 9001 fail.
Operational commands worth keeping
Check service state:
sudo systemctl status minio
sudo systemctl status nginx
Read MinIO logs:
sudo journalctl -u minio -n 100 --no-pagerValidate NGINX after any change:
sudo nginx -t
sudo systemctl reload nginx
Changing ISP addresses requires updating the console's NGINX allow rule and reloading NGINX over SSH.
Final considerations
This architecture keeps MinIO's internal services off the public network, terminates trusted TLS at NGINX, supports large S3 uploads, and adds a second access-control layer around the administrative console.
It does not solve storage redundancy or the archived project's lack of future fixes. Before treating it as durable production storage, add an off-host backup strategy and define a migration path to a maintained S3-compatible project or supported vendor release.